Java Exception Handling
In this tutorial, you will learn to handle exceptions in Java with the help of examples. To handle exceptions, we will use try...catch...finally blocks.
The Exception Handling in Java is one of the powerful mechanism to handle the runtime errors so that normal flow of the application can be maintained.
Exception is an error event that can happen during the execution of a program and disrupts its normal flow. Java provides a robust and object oriented way to handle exception scenarios, known as Java Exception Handling. We will look into following topics in this tutorial.
Java Exception Keywords
There are 5 keywords which are used in handling exceptions in Java.
| Keyword | Description |
|---|
| try | The "try" keyword is used to specify a block where we should place exception code. The try block must be followed by either catch or finally. It means, we can't use try block alone. |
| catch | The "catch" block is used to handle the exception. It must be preceded by try block which means we can't use catch block alone. It can be followed by finally block later. |
| finally | The "finally" block is used to execute the important code of the program. It is executed whether an exception is handled or not. |
| throw | The "throw" keyword is used to throw an exception. |
| throws | The "throws" keyword is used to declare exceptions. It doesn't throw an exception. It specifies that there may occur an exception in the method. It is always used with method signature. |
Java Exception Handling Example
Let's see an example of Java Exception Handling where we using a try-catch statement to handle the exception.
public class JavaExceptionExample{
  public static void main(String args[]){
   try{
      //code that may raise exception
      int data=100/0;
   }catch(ArithmeticException e){System.out.println(e);}
   //rest code of the program
   System.out.println("rest of the code...");
  }
}
Test it Now
Output:

Exception in thread main java.lang.ArithmeticException:/ by zero
rest of the code...
In the above example, 100/0 raises an ArithmeticException which is handled by a try-catch block.
Java try...catch block
We use try-catch block for exception handling in our code. try is the start of the block and catch is at the end of try block to handle the exceptions. We can have multiple catch blocks with a try and try-catch block can be nested also. catch block requires a parameter that should be of type Exception.
Syntax of Java try-catch
try
{
     //statements that may cause an exception
}
catch (exception(type) e(object))
{
     //error handling code
}
Example: try...catch blocks
class Main {
  public static void main(String[] args) {

    try {
      int divideByZero = 5 / 0;
      System.out.println("Rest of code in try block");
    } catch (ArithmeticException e) {
      System.out.println("ArithmeticException => " + e.getMessage());
    }

  }
}
Output

ArithmeticException => / by zero
When the exception occurs, the program skips the rest of the code in the try block
Java finally block
Finally – finally block is optional and can be used only with try-catch block. Since exception halts the process of execution, we might have some resources open that will not get closed, so we can use finally block. finally block gets executed always, whether exception occurred or not.
Syntax of Java try-catch
try{
try {
    //Statements that may cause an exception
}
catch {
   //Handling exception
}
finally {
   //Statements to be executed
}
Example: finally block
class Main {
  public static void main(String[] args) {
    try {
      int divideByZero = 5 / 0;
    } catch (ArithmeticException e) {
      System.out.println("ArithmeticException => " + e.getMessage());
    } finally {
      System.out.println("Finally block is always executed");
    }
  }
}
Output

ArithmeticException => / by zero
Finally block is always executed
In this example, we have divided a number by 0. This throws an ArithmeticException which is caught by the catch block. The finally block always executes.
Working of try...catch...finally
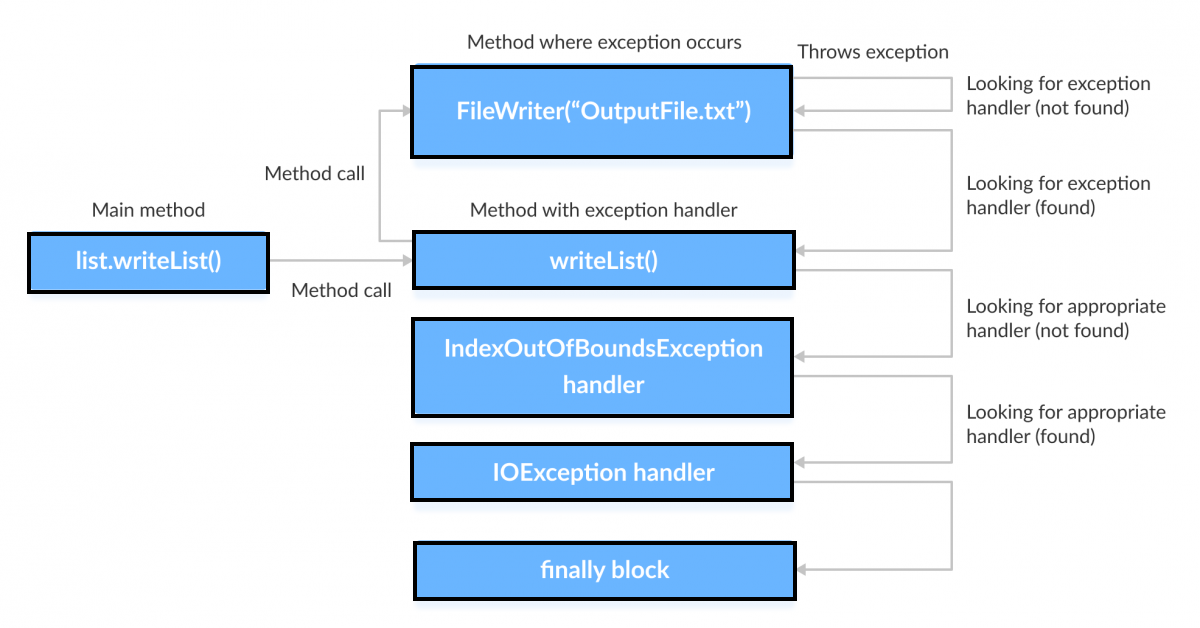
Let's try to understand the flow of exception handling in detail with the help of the above example.

The above figure describes the flow of program execution when an exception occurs while creating a new FileWriter.

